Deploying macOS Line-of-Business (.pkg) Applications using Intune
Updated: Feb 2
There are two primary macOS application installer file extension types: DMG and PKG. Both can be deployed using Intune. There are three primary deployment methods. See below:

In this article, I'll go into detail on the Line-of-business app deployment method, but see below for a quick summary of all the methods:
Line-of-business app: Deploy a simple .pkg application that is signed by an Apple Developer ID Installer certificate and installs one app in the /Application folder.
macOS app (DMG): Deploy a disk image file (.dmg) that contains at least one or more .app files.
macOS app (PKG): Deploy a .pkg application that does not meet all of the requirements of the line-of-business app method.
Table of Contents
Deploying a Line-of-Business App
Remember, that line-of-business apps can only use the .pkg installer file type.
IMPORTANT: |
The .pkg must adhere to the following guidelines provided by Microsoft:
|
In addition to the criteria listed above, the .pkg must install the app to the /Applications folder. If the .pkg installer file does not meet all the above requirements, use the macOS app (PKG) deployment method rather than the Line-of-business app method since it is not as strict.
You can also try deploying the PKG using a script. See the article linked below to learn how:
Steps to Upload and Deploy a Line-of-Business App
Launch Endpoint Manager (Intune).
Select Apps in the left-hand menu blade.
Select macOS.

Select + Add, choose Line-of-business app, and then click on Select.

Next, click on Select app package file then select the folder icon to browse for the .pkg file.
Select OK once done.
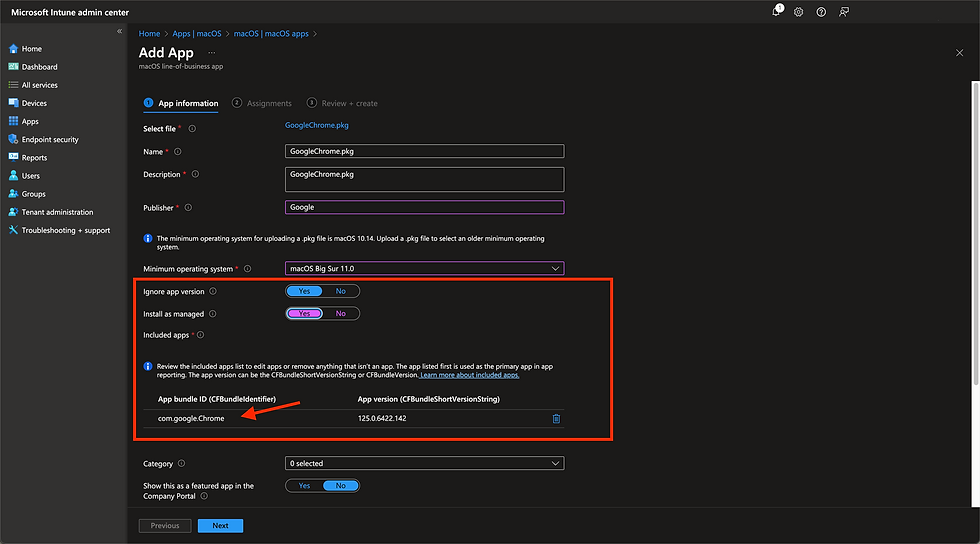
Enter a name and optionally a description.
Enter the name of the Publisher.
Ignore App Version: each app that will be installed by the .pkg installer has an id value (CFBundleIdentifer). Intune uses this ID value to identify applications uniquely.
No: by selecting "no," Intune will check both the ID value (CFBundleIdentifer) of the installed application and its version number (CFBundleIdentifierShortString). If both values don't match what is in Intune then Intune will attempt to reinstall the application.
Yes: by selecting "yes," Intune only checks the ID (CFBundleIdentifer) value of the installed application. If it matches what is in Intune, then Intune marks the deployment as successful.
Install as Managed: if an application is installed as managed, then you can use Intune to uninstall the application if or when needed (without this option, you would have to be creative to uninstall the application such as writing and deploying a bash script). For a .pkg to be installed as managed, the following criteria must be met:
There is only one app installed by the .pkg.
If multiple bundleIDs are detected by Intune, then use the trash bin icon to remove them.
Only leave the parent app.
The app will be installed in the /Applications folder.
The assigned endpoint devices are running macOS 11 or higher.
Included Apps: within the .pkg installer file is nested one or multiple applications; this list should include all the identifying information for the applications. If Install as Managed is set to yes, this section can only have one app's identifying information.
NOTE: |
Intune will automatically scan the .pkg file for the CFBundleIdentifier and CFBundleShortVersionString keys. If more than one is found, ensure that each listed ID is for an app that will be installed in the /Applications folder. If there is a listed ID that will not be installed in the /Applications folder, remove it from this list, since Intune uses this list to verify if the application has successfully installed to the /Applications folder. |
Once done, select Next, choose the device assignment, and create the app deployment.
How to Inspect a .pkg File
As I mentioned above, there are a lot of criteria that must be met to have a successful .pkg installer deployment. Among those criteria were:
Ensuring the .pkg is signed by an Apple Developer ID certificate.
Checking if the app installs in the /Applications folder.
Confirming Intune found all of the CFBundleIdentifier and CFBundleShortVersionString values.
Below are some tools that can help ensure all of the criteria are met by your .pkg installer file.
Tool 1: Pacifist
You can use download and install Pacifist to open the .pkg file and check the following items:
Is the .pkg signed by an Apple Developer ID certificate?
Will the app install in the /Applications folder?
How many apps are nested inside the .pkg?
What are the CFBundleIdentifier and CFBundleShortVersionString values for each .app?
Pacifist is a powerful multi-tool for working with macOS package files, disk images, and file archives. Using Pacifist, you can open a wide variety of file archives, including macOS .pkg package files. https://www.charlessoft.com/
Click here to download the latest version of Pacifist. Once downloaded, install the program then open it to import and inspect your .pkg file. The application will install to the ~/Downloads folder. Double-click to launch it.
NOTE: |
Pacifist is free to use. However, you will have to wait for around 15 seconds each time the program is launched. To avoid this delay, you can pay for the program. |
Step 1: Select Open Package and navigate to the .pkg file

Step 2: Inspect the signature then expand the folders and select the .app file to view the install location.

Step 3: Expand the folders to check for any additional .app files. Also, double-click the Info.plist file to inspect the CFBundleIdentifier and CFBundleShortVersionString values.


IMPORTANT: |
Unless you have the Apple Developer certificate, you cannot alter the .pkg contents. Any alterations require re-signing the .pkg file. |
Tool 2: pkgutil
If you don't want to download and install the Pacifist application, you can use the command line utility, pkgutil, to expand and view the contents of a .pkg file. This tool will allow you to see what is nested in the .pkg file and view the CFBundleIdentifier and CFBundleShortVersionString values.
pkgutil --expand <source_filepath> <destination_filepath> When specifying the destination file path, make sure that the last item in the path name is the name of the folder you want the extracted contents to go to, but do NOT create the folder. The command will create the folder and then extract the contents from the .pkg to it.
Step 1: Run the command to extract the contents of the .pgk file.

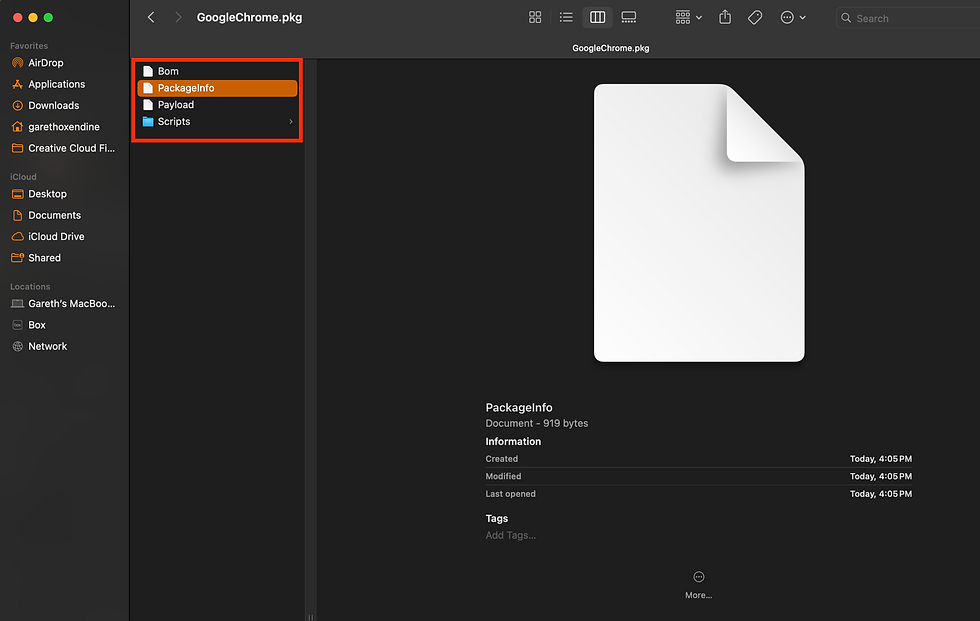
Step 2: If there is a nested .pkg file, right-click on it and select Show Package Contents.

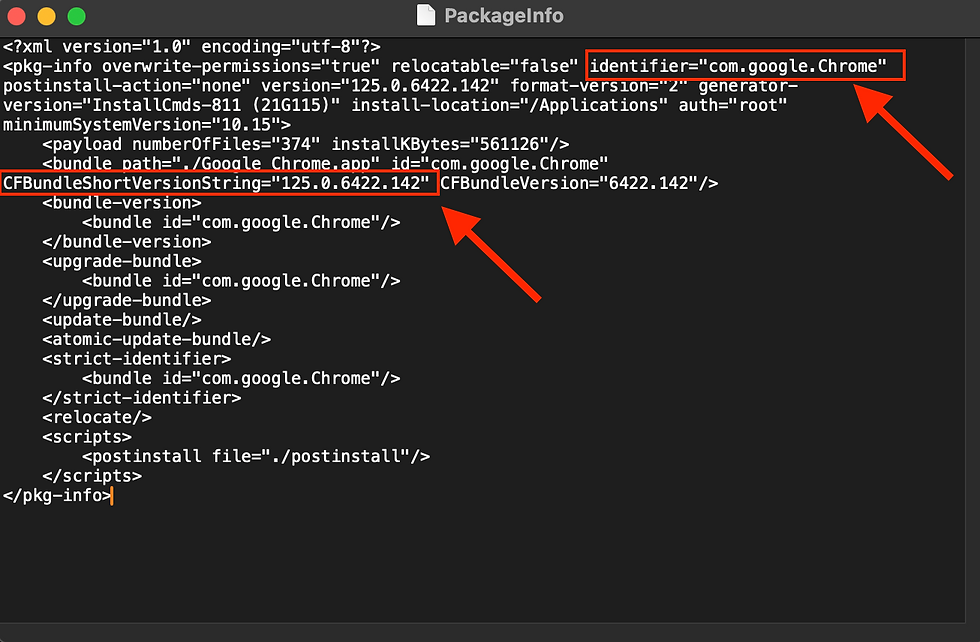
Step 3: Open the PackageInfo text document to view the CFBundleIdentifier and CFBundleShortVersionString values.
Tool 3: Install & Inspect
The best practice and my recommendation is to install the application first on a test machine, then perform the following steps. Once done, you can uninstall the application and then test deploy it with Intune.
Check if the application installs in the /Applications folder. If it does not, or if it installs under a subfolder under the /Applications folder, then you may want to consider using the macOS app (PKG) method.
Check the BundleID (CFBundleIdentifier) of the installed application. Ensure it matches what the installer file had. Sometimes it may be different, causing your deployment to succeed but show as "unsuccessful" in Intune because Intune can't "see" it installed. Use the command below to view the BundleID value.
codesign -dv /folderpath/appname.app 


Comments